Showing posts with label repurpose. Show all posts

Thursday, December 12, 2013

So Happy!

A long time ago my former neighbor gave me probably $500 worth of lockers for around $30, which is what she thought she could get for scrap metal.  A steal.  They went promptly into the backyard shed, but my brain was full of ideas for them as soon as time would permit. A while ago I got out one single tall locker and painted Florida Gator blue on the outside and orange on the inside for my son’s room.  He uses it for his clothes - it’s awesome.  It fuels the friendly rival between father and son since his dad is a Seminole. :)
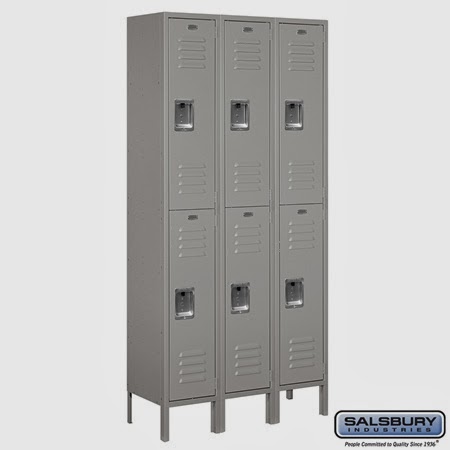
A couple weeks ago I finally got a wild hair to paint the beast.  A double tier, with 6 lockers…which happens to be the number of kids we have.  It looked really similar to this, but with a little rust here and there….


And now it looks like this! Backpacks and jackets are no longer hanging on the backs of my dining room chairs. Woo hooo! :)  (Don’t be jealous that we have a 3 year old resident artist that drew that gorgeous mural on my hutch in the background.  Lucky for him, it is getting a new paint color anyway.)


Tuesday, November 3, 2009

I ♥ My Bathroom

Our master bathroom vanity redo has been technically finished for a few weeks. I've just been working on the details but decided to post since it will probably take a little while until it's completely done, down to the tiniest thing. I'm not an impulsive shopper or decorator. I like to take my time.

Anyway....

Goodbye old bathroom.

Goodbye formerly dark-brown laminate cabinets
with the white paint peeling off.

Goodbye stained and chipped countertop.
Bye-bye ginormous, plain old boring, cracked mirror.

Adios sassy brassy leaky faucet.

Bye-bye overly textured, partially painted walls.

See ya later soap and toothbrush holder that I'm sure had to be
included in the original blueprints for the walls of the bathroom.

Hello beautiful, clean, bright white bathroom I have been dreaming about!


Check out that mirror!
Jill reluctantly gave that beauty up just for me.
Thanks Jilly! ☺


A few little things still left to be done.
Deciding on a ribbon for the drawers is one. I love this idea. I saw it in a magazine and on this blog. I'm just having a hard time finding the perfect one.

I really like the blue.

I like the white too.
But probably the blue more.
Just not sure if I like that particular blue....


Definitely not the yellow.


Painting the little mirror on the floor.
It's for little people who can't see in the big one since
the vanity is quite a bit higher than it used to be.

I'm searching for a glass knob for the closet door.

The light fixture is temporary. It's the old one, painted white,
which is fine but one of the sockets doesn't work.

The picture frame on the wall needs something in it and
we'll probably put in a small towel bar on the opposite wall.

The little houses in the birdcage need a new shade of blue paint.
They're a shade that's too far off everything else in there.

And I've been eyeing a couple of wire baskets
to put underneath the sink for towels.


Details of the project:
Rip out old sink, countertop and vanity.
Install floor to ceiling beadboard.
Tile the area of the old vanity.
Install baseboards and crown moulding.
Paint everything.
Paint buffet to be used as vanity.
Cut a hole and fit the sink.
Reconfigure plumbing for one sink.
Fun Fun Fun!

Friday, September 25, 2009

A-door-able

The master bathroom renovation is underway. Today was demo day, so it's all been gutted, which is pretty boring to look at, but I've been working on some other things this week that will complete the look I'm hoping for.

The plan was to replace the louvered door that leads into the walk-in closet. But then I had an idea....

The door before.


And after.


It was extremely easy.
You don't even have to own any power tools.
But it's more fun if you do.

First, I got rid of the slats, using my jigsaw to cut right up the middle,
then the slats just popped right out.
This left little grooves in the door.


So I covered them with 3/4 inch trim, which fit perfectly, attaching it with Liquid Nails. Another option would be to fill in the grooves with wood filler and then sand it smooth.


I had to sand my door almost to the bare wood because it had two layers of glossy paint on it which was making the top layer peel. Normally you should only have to lightly sand it to rough it up a little before you paint.


I primed, then painted the door.

Using a clearance duvet cover from Target, I made "curtains" for the top and bottom sections. I found small tension rods at Target to hang them. You could staple the fabric in, but I wanted the option to wash them or even switch them out easily if I get tired of the fabric.


It turned out exactly how I pictured it, which is always a good thing. I'm thinking about using this idea on the louvered bifold closet doors in my girls' bedroom.
Meanwhile, I can't wait for the entire bathroom project to be done!!!

Wednesday, September 2, 2009

Skirts

Part of this queen size bed skirt has now become a pint size little girl skirt.
I kinda want to see how many different things I can make out of it.


I'm not sure this could have been any easier.
The hem is already there and the gathering at the waistband is done.
I cut above the skirt part just enough to be able to fold it over and make a casing for some elastic, and then sewed up the side.
30 minutes - tops.


Tuesday, August 18, 2009

Bathroom Furniture

Once upon a time about 5 years ago, I became impatient with my guest bathroom. The year before, in an attempt to update things in there, I painted over the very dark laminate of the vanity and got rid of the matching wallpapered light switch cover. I so wish I had a before picture, but I do not.

It was better with the new paint and such but I was still not satisfied. I was thrifting one day and stopped at one of my favorite thrift stores but they weren't open. As I was leaving I noticed this awesome piece of furniture - a buffet - in the window. I was in love. I'm telling you I went back to that store and gazed at it through the window 3 more times before they were actually opened. It was one of those places where the owner shows up whenever they want to.

Anyway, they finally opened and I finally got in there, pushed all the other customers out of the way (not really) and bolted straight to the buffet, asked how much it was, whipped out my handy little tape measure to be sure and took it home. (It was 60 bucks - a no brainer.)

I left it the original color because it went well with the new wallpaper and paint I was going to use.

After pulling out the old vanity myself (when I get excited about a project I can't wait around for my husband to get home from work to help me), and installing a sink and new plumbing, after a few days this is how it turned out.


I was able to salvage some space in most of the drawers by cutting and rebuilding the drawers around the plumbing. For the drawer that's directly under the sink, I removed the actual drawer and then permanently screwed the drawer front back in place so it doesn't open at all.


Today I took these pics of the antique dresser turned vanity I helped make for a friend. She's very close to moving into her newly built gorgeous home after a fire destroyed her other gorgeous home over 2 years ago.

Here's the before.


The sink she bought prior to buying the dresser was slightly to big for the dresser top so she had a counter top made to fit the sink and I think it turned out beautiful! We were able to save almost the entire bottom drawer for toilet paper storage.


Doing that vanity for her got me more excited to do one for my master bathroom. I've been looking for a looooooong time to find a piece of furniture that is precisely the right measurements and just last week I lucked out and got this beauty.


(Only I talked him down to $110. ☺)

I hope I can have it done in the next few weeks.


Monday, August 10, 2009

Duct Tape - How Do I Love You....

Let me show you one way.

On the hunt for a bolster pillow to go with my new black bench (yes, I kept it for myself), I found a nice $20 one at Ikea, which is a good price for as big and as nice as it is. But it was waaaaaay too big for the bench. I kind of knew it would be but I had a backup place to use it so I got it anyway. ☺

So, I had a thought to make a pillow the right size without sewing anything. In my opinion, some things just aren't worth taking the time to sew.

So I took an old king-size pillow and some good old duct tape - in fashionable colors - not that it matters - and folded the pillow in half and taped it like that. I thought about tying it with string, which would definitely work, but this was just way faster. Take note this is an old pillow, meaning not alot of poof left in it. I think a brand new one would be more difficult to tape down.


I promise that pillow has never been peed on.
It's just water-stained from going to bed with wet hair.


I put it in a bolster cover I already had (2 for 2.99) at Ikea, which I intend to change as soon as I find the right fabric to make a new one (that's definitely worth the time to sew) but for now this one is cute enough.

Wednesday, July 22, 2009

Garbage To Gorgeous!

Okay, I just finished the headboard/footboard project - the one I got out of the garbage on the side of the road.

Here is the before, fresh from the trash.


And here is the after.


Yummy, huh? I really LOVE the black. I've made several of these and have never painted one black before. I'm very happy with the result. I may just have to find a place in my house instead of giving this one away.

Here are a few more.